


From dying lawn to paradise garden
In the fall of 2010 I was mowing my ugly, dying lawn when I was struck by how much time, energy, water and money went into keeping our grass alive. This plant had no business on the high plains of Colorado, and making it my business to keep it mowed, watered, weeded, aerated and fertilized seemed absurd considering how much waste was involved and how little I enjoyed it.
You can read more of this backstory here, and check out the incredible book “Food Not Lawns” that inspired it. Long story short, I found myself enamored with the idea of transforming the land we lived on into a place of beauty, providing a better backdrop for our summer days that feed us at the same time. The greenhouse emerged as the central element to making this vision a reality. (Scroll to the bottom for more pictures!!)
I want to thank David LaFerney at The Door Garden for his great post which helped guide my greenhouse project. I modified his design based on the noted weaknesses of his original concept to arrive at a design that is more robust, although the process of construction was very similar.
Planning

I set out to design a lightweight greenhouse that would still stand up to the monstrous snowfalls we can get here in the Front Range of the Rocky Mountains. I came up with a pointed (gothic) roof instead of the simpler curved (quonset) design you see on most “hoop house” greenhouses, using 2×4’s for the framing, and using plenty of ribs down the length of the house.
My original design called for a footprint of 7 x 10′ (70′ sq. feet), but after a visit to an organic farm in Boulder where I got to see a large (20′ x 40′) aluminum-framed greenhouse full of beautiful vegetables, I followed the owner’s advice to build it “as big as you can,” and so extended it as far as I easily could, arriving at 7′ x 16′, or 112 sq. feet.
This design is easy to construct, modular, and can be quickly built by the “assembly line” method I detail below.
Material List
While I wanted to complete this project using as many reclaimed resources as possible, I none the less found myself at Home Depot more than once out of convince. The “$50 Greenhouse” is kind of a joke… the Door Garden one totaled ~$150. I will total everything up here when the project is finished, already I think I’m at just under $150. It’s not the big materials but the small stuff that gets ya! Here are the materials I used:
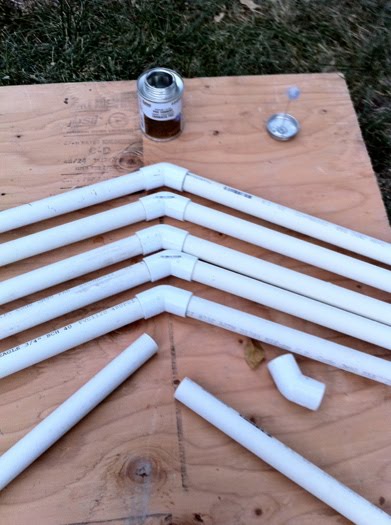
- 10′ 3/4″ PVC pipe (18 for 9 total ribs)
- 120º PVC connectors (9)
- PVC Cement
- 1 qt, matte-white exterior latex paint
- 8′-10′ 2×4’s (about 15 pieces)
- 2′ 3/4″ rebar (15)
- 4′ “Tree support pickets” (6) – I’ll find out what these are really called…
- 10′ 1×1’s (10)
- 4″x8″ vents (2) – Not sure if these will be useful, they look nice though!
- 2 1/2″ Exterior sheeting screws
- 1 1/2″ Exterior sheeting screws
- Bailing wire
- Utility knife (box cutter)
- 6 mil Clear plastic sheeting (more on this later)
Indispensable Tools:
- Circular saw
- Cordless drill
- 3/32 Drill bit
- Staple gun
- Sledge hammer
- Pliers / wire cutters
- Tape measurer / speed square
- Bubble level
- Helper piggy (no, you can’t borrow mine)

Build that sucker
Step 1: Support Groups
Projects go faster when you find repeatable steps and do them in an assembly line fashion. The three support members (the door, endwall and central rib) all have the same basic structure, so I started here and built all three at the same time.
I began by cutting three 2×4’s to the width of my design’s footprint (7′). Next I constructed the ‘ribs’ that attach to them. I cut PVC pipe into 7.5′ sections and joined pairs together with 120º connector segments and PVC cement.


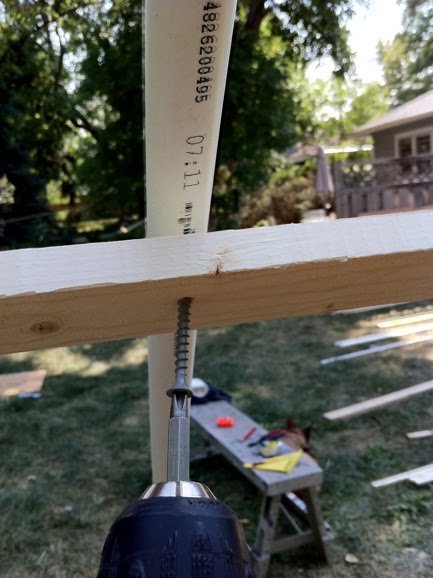
To connect the ribs to the 2×4, drill a small hole through the PVC at the bottom of one of the corners and fasten with a 2 1/2″ screw. Then flex the rib by bringing the other end down and drilling/fastening the other bottom corner. With the pvc now in this nice shape, you can drill and fasten another screw on each side.

Next I constructed the uprights that brace the pvc and create the doorways. I measured 2′ in on each side and laid 2×4’s on these centers flush against the bottom beam. I traced the curve of the pvc pipe where it intersected the 2×4 and cut the approximate straight angle. (Err on the long side for your first cut. You can always make something shorter but you can’t make it longer again!) You could use a reciprocating hand saw to cut a curve, but a straight cut will get you close enough.
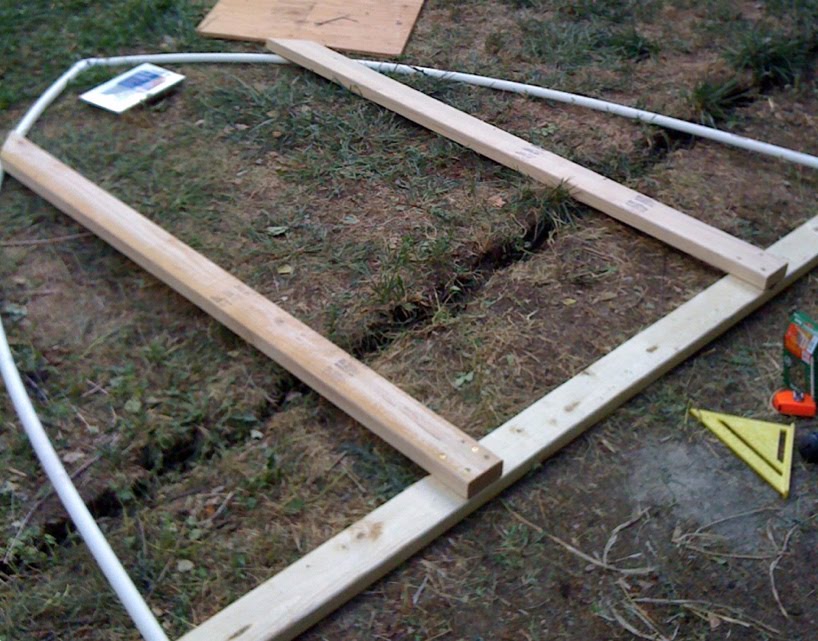

Once you have done this once and have an upright that fits nicely, you can use this piece as a template and to cut the remaining 5 uprights. Attache the uprights to the base boards and connect to them to the pvc by drilling holes and driving screws. The screws will probably have to go in at two different angles so as not to punch through where the angles converge.

The two end sections were supported with horizontal cross members because I originally planned to have doors at both ends. I later opted for one door for simplicity’s sake. The central section had an angled design for more headroom inside the greenhouse. If this is too fancy for you another horizontal beam would work fine. However, after I built this center section it made me wish I had built both end sections the same way as it is much stronger and prettier and you can literally do chin-ups from the frame above.
Awww, sheeeeeet….
With these three sections built it was on to the plastic sheeting!
I know better than to use non UV-treated plastic, but I tried several local suppliers for green house plastic and some of the prices I got back were “prohibitive” to say the least, as much as $3.25/sq ft with the smallest order being 100 sq ft! There are suppliers online, but as I am impatient and want to finish this this weekend, I swallowed my better judgment and bought the non UV-treated 6 mil sheeting from home depot. I’ll see how it goes…
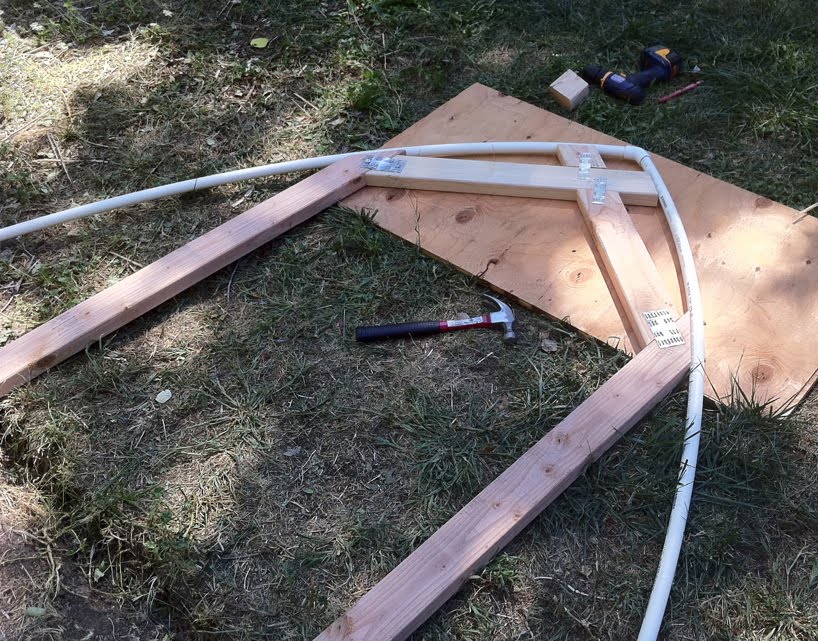
Regrettably I did not take photos of the plastic sheeting procedure as my wife and I were battling breezes, but I followed the method that David used, basically wrapping the ends like big christmas presents, pulling the excess back and stapling it behind, then cutting off the remaining material.
 |
| This shot is from later in the process but shows both the horizontal frame piece and the plastic wrapped and stapled behind the end section. You can also see how the vent is attached. |
The door section was wrapped just like the other end. To create the opening I cut out a square hole that was 3-4″ smaller that the door frame, then cut in at angles toward each corner of the doorway. I pulled the resulting flaps back and stapled them to the door frame.
Step 2: Post-its
After carefully measuring I pounded the “tree-support pickets” in where the doors are located at both ends, and in the center of the greenhouse.

Then I dug a small trench where the bottom frame piece would lay.
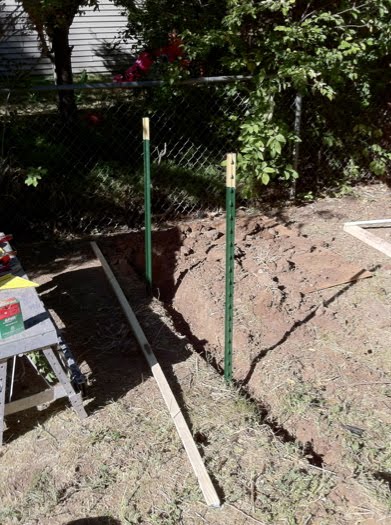

I laid the section in the trench and filled in with dirt underneath the beam until it was level, then filled the surrounding space. I think this will give the sections a bit more stability and it lowered the floor beam for a nice step over height. I affixed the doorways to the posts with bailing wire. You can see the wire in the following pics.
Step 3: The Ribs
With the three support sections installed it’s time for rebar. I used a string to make a straight line between the support sections, then measured the distance (three ribs between each support) and pounded sections of 2 ft rebar into the ground until 5 inches extended above the surface.

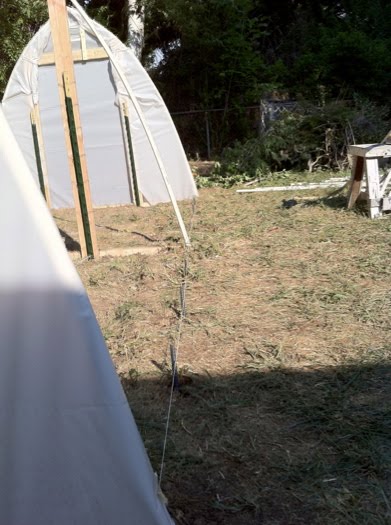
Then I cut and assembled the remaining ribs and slid each end onto the protruding rebar.

Finally starting to look like a green house! I adjusted each rib on either side to make sure the heights were the same and that the central spine was fairly straight. For some ribs this meant digging down around the rebar to slide the pipe further down, other ribs needed to be propped up with piled dirt.
Step 4: Brace Yourself
Next I installed braces to connect the ribs to each other and the support members. I used 2×2’s mounted with screws from the inside. I connected the brace beams to the support members at the 2×4’s rather than the PVC for added support. In addition to being structural elements, these beams have proved useful for hanging baskets and attaching sprinklers to the inside of the structure.


Top and bottom!

I left the bottom braces short on the ends because I had no place to attach them to the doors (on account of my wrap job). I regret this (I’m a perfectionist) but structurally it’s ok as the upper beams ARE connected to the doorways.
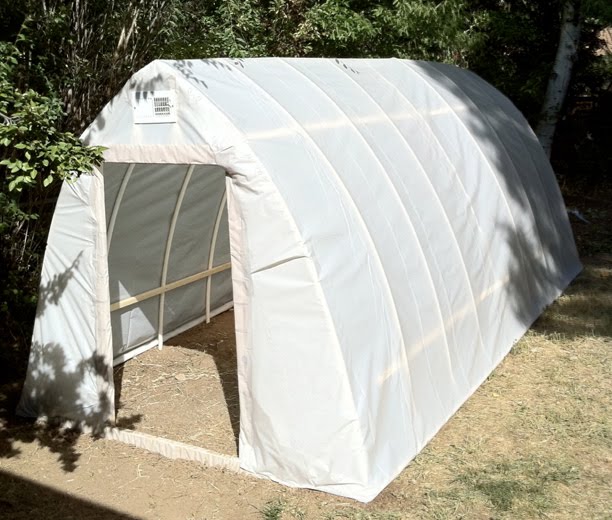
Step 5: Take Cover

Next, covering the frame. I’m using 20ft sheeting, so I used this dimension for the width of the house, and cut ~17″ for the dimension that goes over the top. I used a piece of plywood, a speed square and a scrap 2×2 to ensure a nice straight cut. Since this small cut will unfold to be a 20ft edge, the straighter the better!

Along the bottom edges where the sheeting meets the ground, I used a 2×2 cut to the length of the greenhouse to add weight and straighten the covering. I laid the 2x2s at the edge of the sheeting (see photo below) then rolled them tightly into the sheeting, using staples to hold them in place.

With the 2×2’s attached on each side, I pulled the covering over the house and pulled it taut on both sides. The covering extended about 8 inches beyond the ends of the greenhouse. I cut a slit in the excess about 4 inches outward from the peak of the roof, then cut off this excess following the curve of the house, leaving enough to fold over and attach. (See the next two photos)


Finally, I used a combination of staples and clear duct tape to shape and attach the excess sheeting to the ends of the house. I also stapled the sheeting to the wooden beams that connect the ribs, creating a nicely-taught covering.
I could have done this earlier, but I decided to add a central beam down the center of the roof to help prevent snow and water accumulation. I cut scrap PVC to length and joined them with straight connectors, then used tiewraps to attach the pole at each 120º connector at the apex.
 |
| Who is Jim Eagle? |
And voila!

Four Years Later…
This little greenhouse has enriched our lives in ways I can barely describe. Here are a handful of images from the last few growing seasons! Keep in mind I had ZERO gardening experience prior to building this greenhouse! Anybody can do this. You can too ; )


Cheers,
~r